
Server data from the Official MCP Registry
Drive SolidWorks from AI agents: parts, assemblies, drawings and export over the COM API.
About
Drive SolidWorks from AI agents: parts, assemblies, drawings and export over the COM API.
Security Report
Valid MCP server (1 strong, 3 medium validity signals). 5 known CVEs in dependencies Package registry verified. Imported from the Official MCP Registry.
4 files analyzed · 6 issues found
Security scores are indicators to help you make informed decisions, not guarantees. Always review permissions before connecting any MCP server.
Permissions Required
This plugin requests these system permissions. Most are normal for its category.
How to Install
Add this to your MCP configuration file:
{
  "mcpServers": {
    "io-github-andrewbartels1-solidworks-mcp-python": {
      "args": [
        "solidworks-mcp-python"
      ],
      "command": "uvx"
    }
  }
}Documentation
View on GitHubFrom the project's GitHub README.
SolidWorks CAD Assistant & MCP Server





Python MCP server for SolidWorks automation with 155 tools, plus an optional agent/prompt-testing layer for AI-assisted workflows.
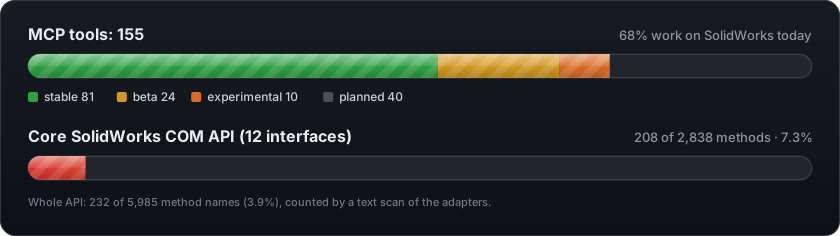
Generated from the code; click it for every tool, its level and why, filterable by level and family.
Two tools in one
-
A Python interface for scripting SolidWorks. The adapters wrap SolidWorks' COM API in plain
asyncPython calls, so you can automate it from your own scripts without an AI in the loop:from solidworks_mcp.adapters.base import ExtrusionParameters from solidworks_mcp.adapters.pywin32_adapter import PyWin32Adapter adapter = PyWin32Adapter({}) await adapter.connect() await adapter.create_part() await adapter.create_sketch("Top") await adapter.add_rectangle(-20, -10, 20, 10) # mm await adapter.exit_sketch() await adapter.create_extrusion(ExtrusionParameters(depth=10)) -
An MCP tool server on top of it. The same calls, exposed as 155 MCP tools, so an agent such as Claude Code can build parts, assemblies and drawings from a description. Each tool carries a support level (stable, beta, experimental or planned), so the agent knows how far to trust it.
See it work
A whole mechanism from a description
I took SolidWorks' own U-Joint sample, read every part, sketch, feature and mate, and wrote it up as a plain-English prompt: eight parts, a crank sub-assembly, and a main assembly that has to move like a real joint. Then Claude Code (Opus 5.5, medium effort) built it from that prompt alone.
I want to build a small hand-cranked universal joint in SolidWorks: eight parts, a crank sub-assembly, and the main assembly. It's a mechanism: turning the knob turns the crank, which drives the joint through an angle, so the assemblies must still move the way described in sections 9 and 10. Please reason through each part before you start drawing, check every part once it's built, and tell me if something can't be done with the tools rather than guessing. All sizes are in millimetres (the original was drawn in inches, so the numbers are odd). SolidWorks' Y axis is up. Save every part and both assemblies in this folder, with the names given below.
1. bracket.SLDPRT: a bent plate, 6.35 mm thick and 38.1 mm wide. Seen from the side (sketch on the Right plane, Y up, Z towards the front), the inside outline of the bend is an open chain:
- a back wall going straight up 82.55 mm from the origin;
- from its top, a top arm going forward 57.15 mm;
- from the origin, a bottom foot going forward 44.45 mm;
- from the front of the foot, a lip rising at 40° for 42.77 mm (it ends 27.49 mm up and 77.22 mm forward). The 6.35 mm thickness is on the outside of that outline: above the top arm, behind the back wall and under the foot. The 38.1 mm width is centred on the Right plane. Drill a 12.7 mm hole straight down through the top arm and on through the foot below it (one cut, both plates), centred across the width and 38.1 mm forward of the back wall's inside face.
2. Yoke_male.SLDPRT: a fork with a stub shaft.
- Start with a 38.1 mm diameter cylinder, 47.625 mm tall, standing on the Top plane.
- Its bottom becomes a fork with two ears. Each ear is 19.05 mm wide and 8.89 mm thick, and the gap between them is 20.32 mm, centred. Each ear has a rounded end: a full radius of 9.525 mm, centred 9.525 mm above the bottom. Where an ear meets the solid part of the cylinder, round the shoulder with a 9.525 mm radius, so the solid part starts 29.21 mm above the bottom.
- Drill a 9.525 mm cross hole through both ears at the centre of their rounded ends, square to the ears.
- On top, add a 12.7 mm diameter stub, 19.05 mm tall, on the cylinder's axis. Chamfer its top edge 1.27 mm at 60°.
- Cut a flat on the stub, 12.7 mm long down from its top. The flat is 4.7625 mm from the axis, so it is 1.5875 mm deep.
3. Yoke_female.SLDPRT: the same 38.1 x 47.625 mm cylinder with the same fork and the same cross hole as the male yoke, but no stub. Instead, a 9.525 mm hole goes all the way through along its axis.
4. spider.SLDPRT: a 19.05 mm cube centred on the origin. It has two 9.525 mm holes, both through its centre: one front to back, and one left to right.
5. pin.SLDPRT: a 9.398 mm diameter rod, 38.1 mm long.
6. crank-shaft.SLDPRT: a 12.573 mm diameter shaft, 40 mm long, standing on the Top plane.
- Around its bottom 15.875 mm, a collar 18.923 mm in diameter.
- A 4.763 mm fillet where the collar meets the shaft, and a 4.763 mm fillet on the collar's top outer edge.
- In the bottom, a D-shaped socket 12.7 mm deep. It is a 12.954 mm circle with a flat 4.889 mm from the axis, to take the male yoke's stub.
- A 2.381 mm cross hole through the collar wall, square to the socket's flat and 6.35 mm up from the bottom.
- At the top, a matching flat 6.35 mm long, 4.889 mm from the axis.
- A 0.794 mm x 45° chamfer on the top end.
7. crank-arm.SLDPRT: a flat bar, 75 x 19.05 x 6.35 mm.
- Near one end, a 12.7 mm D-hole centred 9.525 mm from the end and on the bar's centreline. Its flat is 4.889 mm from the hole's centre, towards that end. It fits the shaft's top flat.
- Near the other end, a 4.763 mm hole 9.525 mm from that end, also on the centreline.
8. crank-knob.SLDPRT: a mushroom-shaped knob, revolved 360° about the vertical axis. Going up from the bottom, its profile has:
- a 4.572 mm diameter shank, 6.35 mm long;
- a step out to a 9.525 mm diameter;
- a concave quarter-round of radius 6.35 mm that flares out to 22.225 mm diameter, 12.7 mm up;
- a convex half-round of radius 4.7625 mm that reaches 31.75 mm diameter at its widest;
- a flat top 22.225 mm in diameter, 22.225 mm above the bottom.
9. crank sub.SLDASM:
- The crank shaft is fixed.
- The crank arm's D-hole goes on the shaft's top flat: the hole is concentric with the shaft, the flats are parallel, and the arm sits on the shoulder where the flat starts. The flats lock the arm to the shaft, so they turn together.
- The knob's shank goes into the arm's small hole, with the knob's step resting on the arm's top face. The knob stays free to spin in its hole, like a handle.
10. UJoint.SLDASM:
- The bracket is fixed.
- The male yoke hangs under the bracket's top arm. Its stub goes up through the bracket's hole (concentric), and the top of its cylinder is flat against the underside of the arm. It must stay free to turn in that hole.
- The spider sits centred between the male yoke's ears, with one of its holes lined up with the ears' cross hole. It pivots on that axis.
- The female yoke's ears go around the spider's other hole, centred on the spider. Its top face is parallel to the bracket's sloped lip, so its axis points down and forward. It pivots on the spider and turns about its own axis.
- Put one pin through the male yoke's ears and the spider, and one pin through the female yoke's ears and the spider. Each pin's ends are flush with its yoke's round outside, and each pin turns with its yoke.
- Insert the crank sub-assembly. Its shaft's D-socket goes over the male yoke's stub: concentric, with the flats parallel, and the bottom of the shaft 1 mm above the top of the bracket. The flats lock the crank to the male yoke.
- The result should be a mechanism with one free motion: turning the knob around the crank shaft's axis turns the male yoke, the spider rocks on its pins, and the female yoke turns about its tilted axis. Choose mates that leave exactly those rotations free and lock everything else.
When it's all built, check each part's size and the assembly's component and mate counts, say which rotations your mates leave free, and tell me what you couldn't do.
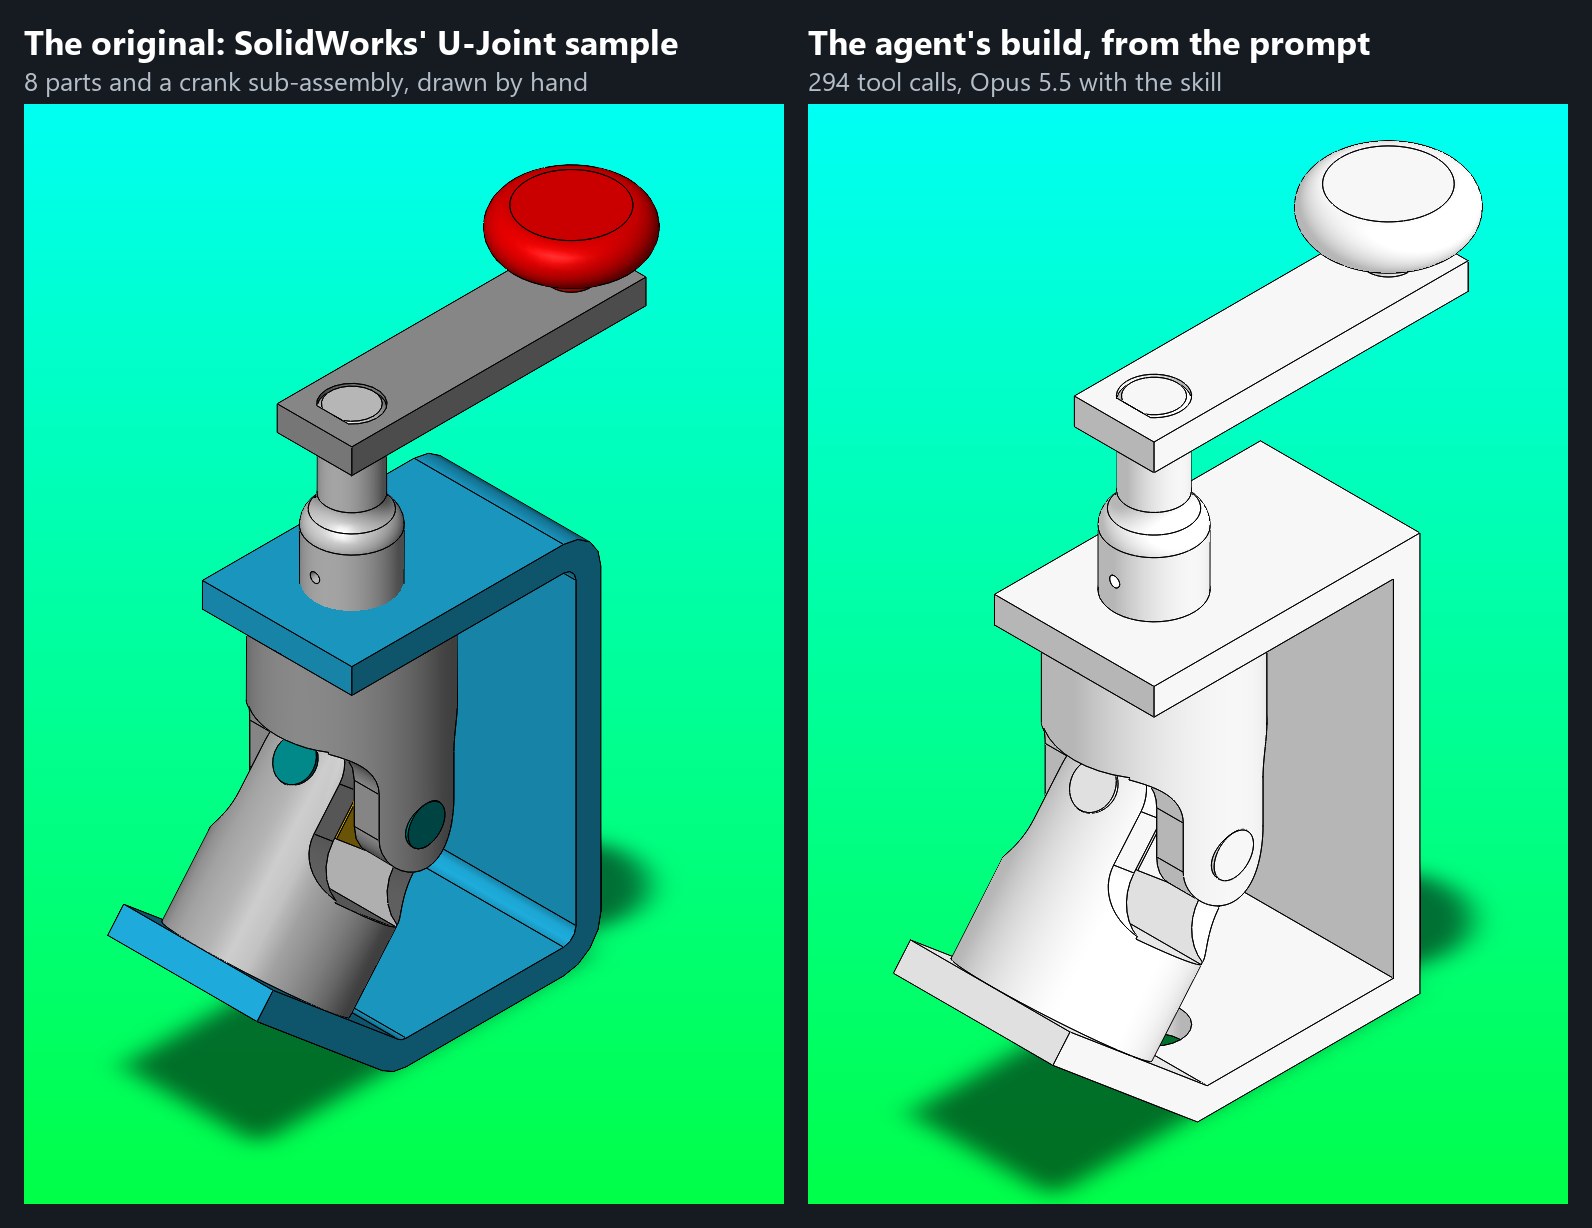
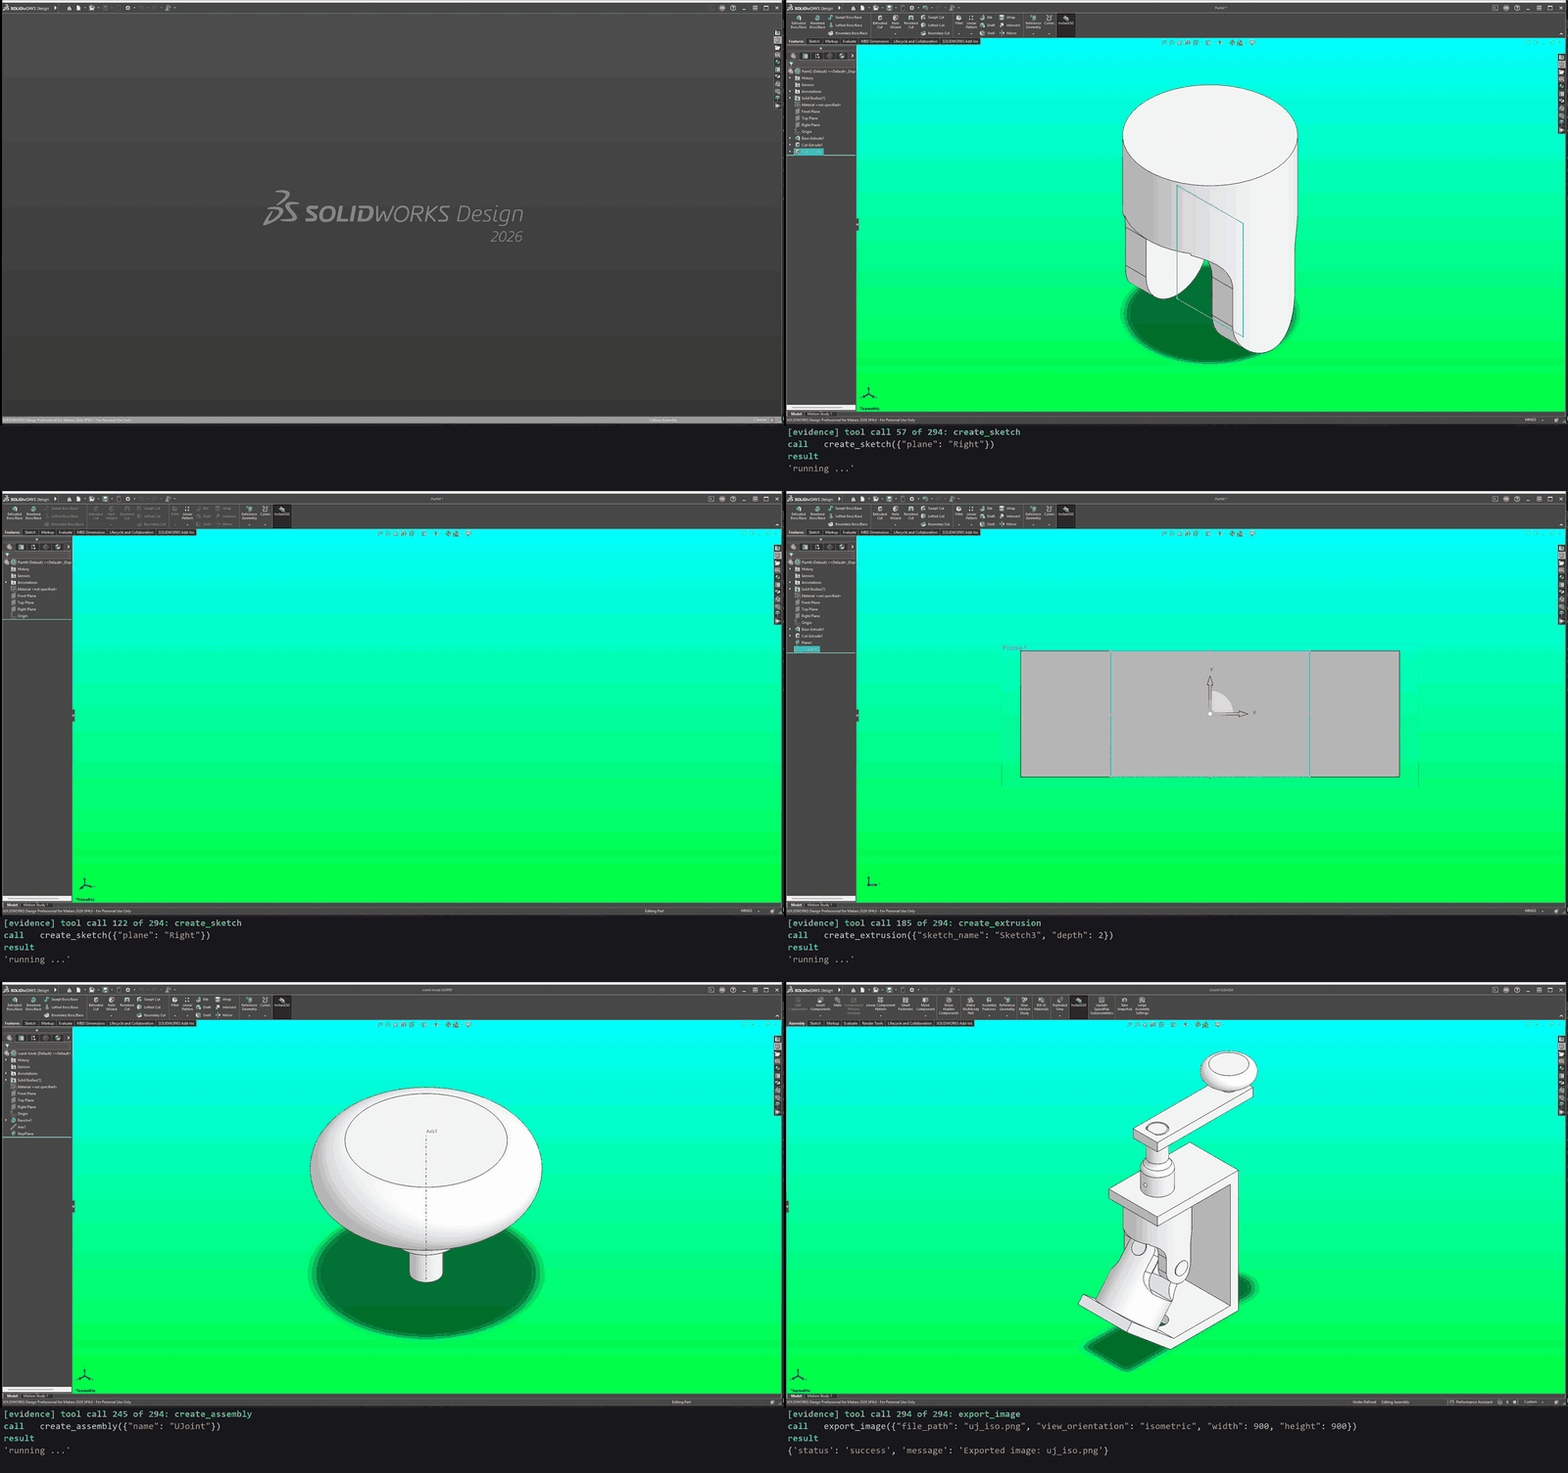
Six of the eight parts match the sample's volume within 0.2 %, and all eight within 1 %. The mates leave the mechanism free to turn. The recording replays the session's 294 calls (sped up 80 times). The walkthrough has the prompt, the part-by-part comparison, and what the agent couldn't do. The same prompt run with and without the agent skill made the same parts, which is why I want skills that improve results (#207).
A drawing package from one prompt
Make a 100 x 50 x 10 mm AISI 1020 mounting plate with four M5 clearance holes, 10 mm in from each edge, and draw it fully dimensioned. Stack two of them 10 mm apart, check the result, and draw the assembly with a BOM.
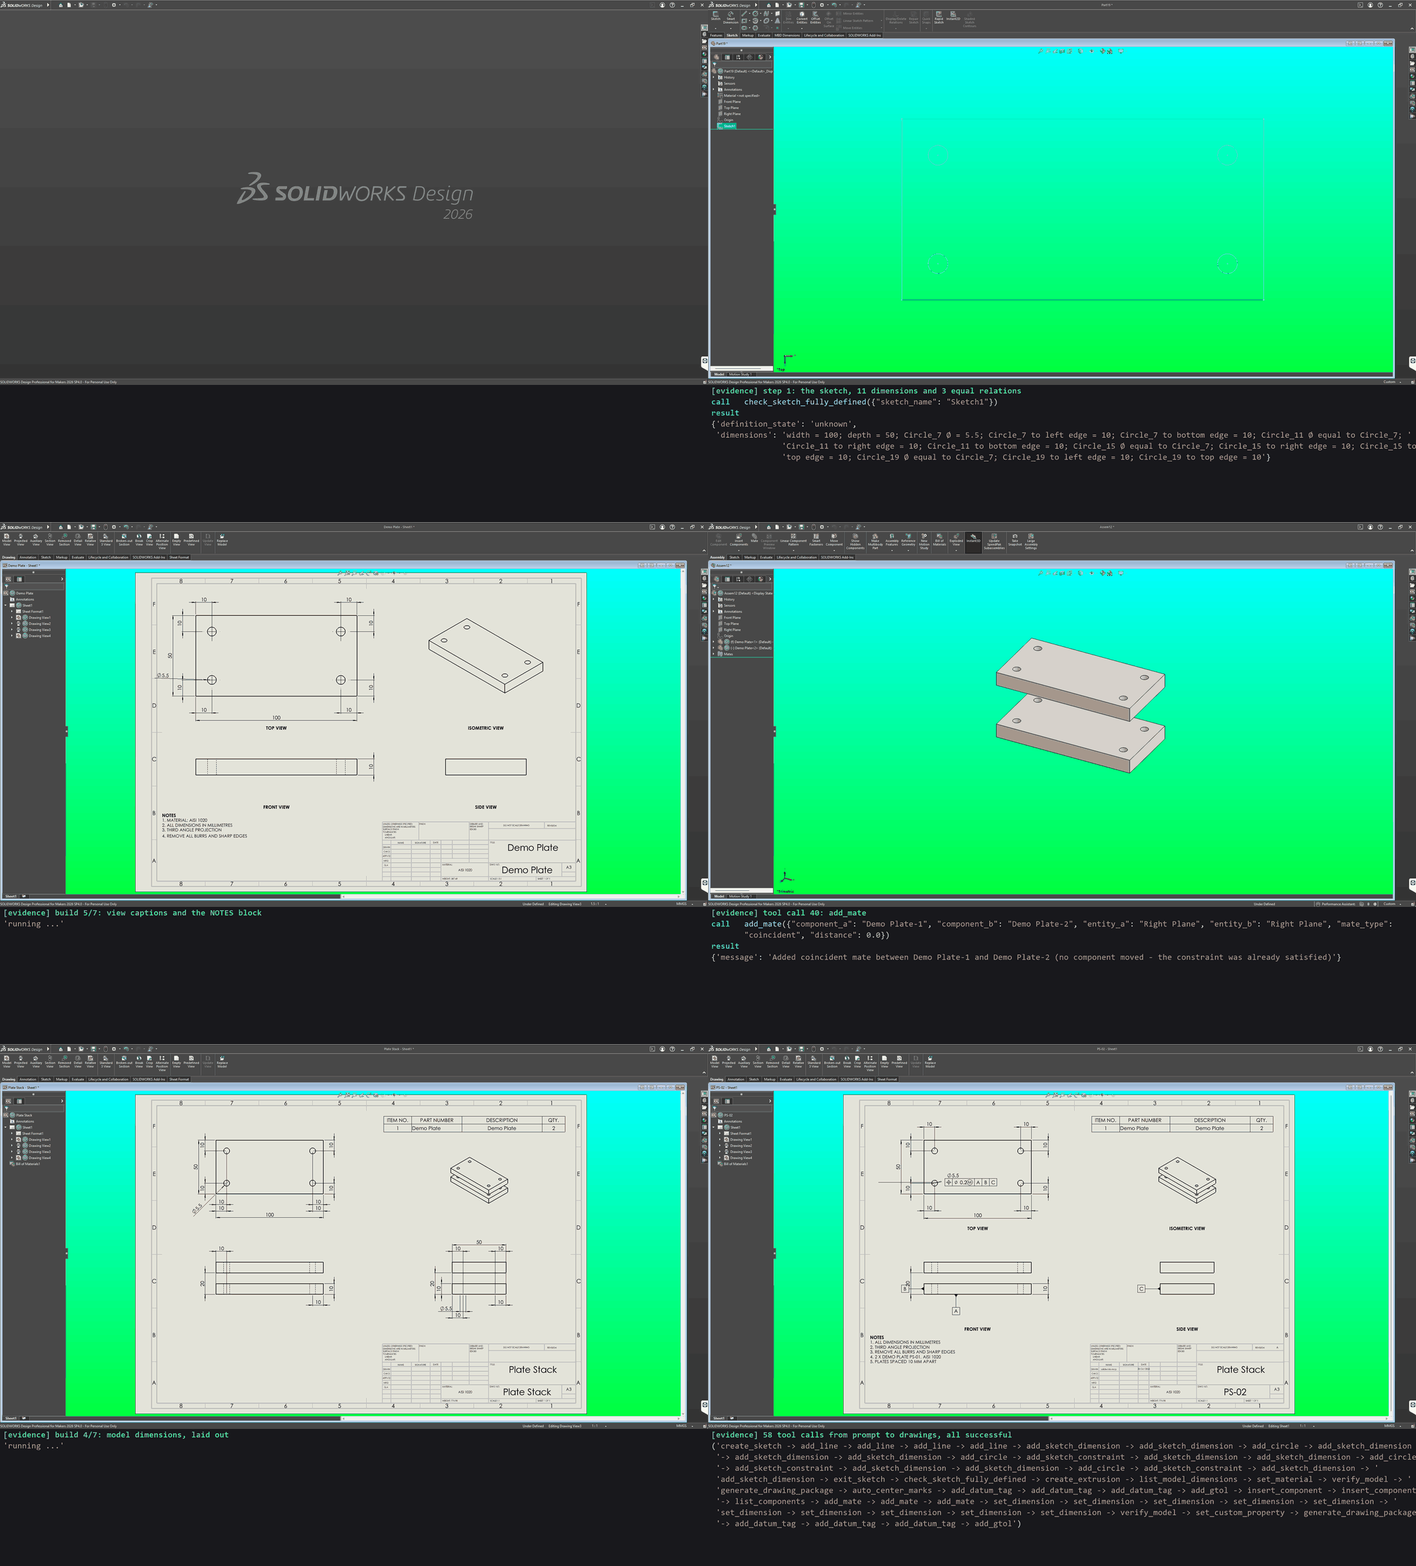
The 58 tool calls an agent made from that prompt, run against SolidWorks 2026 through the same MCP tools a client calls, and recorded (sped up five times). Each result is checked against a hand calculation: the plate's volume and mass, the 10 mm gap and the BOM quantity. This is a replay of the calls, not a recorded model session.
Note: the demo is not perfect, and is not the most efficient way to get this result. The run pauses after each call so it can be read, and the calls are chosen to show what the tools can do: every sketch dimension is added one at a time, and the mate distance is stepped down only so the plates are seen coming together.
The walkthrough in the docs has the agent's plan and every call with its arguments. Run it yourself with the README demo; the calls are also in plate_stack_calls.json.
- Sketch (24 calls):
create_sketchon Top; fouradd_linefor the 100 x 50 outline;add_circlefor each Ø5.5 hole;add_sketch_dimensionfor the 100, the 50, one Ø5.5 and each hole 10 mm from two edges;add_sketch_constraintmaking the other three holes equal;exit_sketch - Check and extrude:
check_sketch_fully_defined,create_extrusion10 mm (+49 049.7 mm³ read back) - Material and check:
list_model_dimensions(finds the Ø5.5 by value),set_materialAISI 1020,verify_model(volume, mass 0.3875 kg, size, 1 feature, 1 body) - Plate drawing:
generate_drawing_packagePS-01 (A3, four views, every model dimension laid out with no overlaps, notes, title block, PDF),auto_center_marks - GD&T:
add_datum_tagA, B and C, thenadd_gtol⊕ Ø0.2 Ⓜ A|B|C on the Ø5.5 - Assembly:
insert_componenttwice,list_components,add_mateFront and Right coincident and Top planes 60 mm apart,set_dimensionstepping that distance down to 20 mm (10 calls),verify_model(2 parts, 3 mates, no interference; the stack measures 30 mm, so the gap is 10 mm) - Assembly drawing:
set_custom_propertyMaterial,generate_drawing_packagePS-02 withinclude_bom(the BOM above the isometric: Demo Plate, QTY 2), then the same datums and position frame
Overview
Tried it? Tell us what worked and what didn't in a feedback issue. Reports from real setups decide what gets fixed next.
This project focuses on practical SolidWorks automation with an AI-friendly loop:
- describe intent
- generate a plan
- execute MCP tools
- inspect results
- iterate
It includes:
- core MCP runtime for SolidWorks tool execution
- COM/VBA routing and adapter safety wrappers
- tool coverage across modeling, sketching, drawing, analysis, export, automation, templates, and macros
- optional agent orchestration/testing utilities under
src/solidworks_mcp/agents/
Demos
Each GIF is a live test driving SolidWorks 2026 through the MCP tools, with the call and its result captioned beneath. Click one to see what it checks, a prompt that asks for it, and its tool calls.
See every demo in the docs: what each one shows, its prompt, every tool call with its arguments (all 58 for the demo at the top), and how to run them yourself.
Supported Today
- Windows + SolidWorks COM automation for the main CAD lifecycle.
- Tested on SolidWorks 2026. Earlier versions may work but are untested; if you try one, please open an issue with what worked.
- Modeling, sketching, drawing, analysis, export, automation, templates, and macro tools.
- Every tool's support level, and the reason a tool isn't stable yet, is on the progress page.
Not Yet / Simulated
- Mock adapter output is simulated and should not be treated as engineering truth.
- Live 3D viewport streaming in a UI.
- Checkpoint-level interference validation.
- Simple simulation and fluid workflows
- Simple Topology Optimization via SimulationXpress etc.
Install
You need Windows 10 or 11 and SolidWorks (opened at least once). In PowerShell, install uv, then open a new PowerShell window and run setup:
powershell -ExecutionPolicy ByPass -c "irm https://astral.sh/uv/install.ps1 | iex"
uvx solidworks-mcp-python setup
uv fetches Python 3.13 and the server from PyPI by itself; nothing to clone. The guided setup then:
- finds your SolidWorks version and the MCP clients on your PC: Claude Desktop, Claude Code, VS Code, Cursor and LM Studio;
- lets you pick which clients to connect;
- starts the server once to check that it lists its tools (in mock mode, so SolidWorks isn't touched);
- adds a
solidworksentry to each client you picked, then tells you what to restart.
Nothing needs a login or an API key, and the server runs only on your PC. Setup changes only the solidworks entry in each client's config. It backs the file up first and never shows or changes your other servers. Other entries that start this server the old way (run-mcp.ps1 and the like) are offered for removal, so tools don't load twice.
To check it worked: open SolidWorks, restart your client, and ask "What model is open in SolidWorks?"
The package is solidworks-mcp-python. uvx solidworks-mcp installs a different project. To work on the server itself, install from a clone. More fixes are in Troubleshooting.
Connect your client
Run setup again whenever you want to add a client:
uvx solidworks-mcp-python setup
| Option | What it does |
|---|---|
--client claude-desktop | Configure one client without the list. Repeat it for several (claude-code, vscode, cursor, lmstudio). |
--dry-run | Show what would change, and change nothing. |
--yes | Don't ask: configure every client found. |
--remove | Take the solidworks entry out again. |
--replace-old | Remove older entries for this server without asking. |
--mock | Configure mock mode, which answers without SolidWorks (for trying the tools). |
--year 2026 | The SolidWorks release to start the server with. Default: the newest installed. |
To set up a client by hand instead, each one runs uvx solidworks-mcp-python --year 2026, with your SolidWorks year. --year names your installed SolidWorks release and is required for real SolidWorks; setup fills it in for you. It picks which SolidWorks API the lookup tools answer for. Without it, the server logs a warning and uses the newest installed release. If a client can't find uvx, use its full path, from (Get-Command uvx).Source.
Add this to claude_desktop_config.json, alongside anything already in it. Depending on how Claude Desktop was installed, the file is in one of:
%LOCALAPPDATA%\Claude-Data\claude_<id>\(current releases)%LOCALAPPDATA%\Packages\Claude_<id>\LocalCache\Roaming\Claude\%APPDATA%\Claude\
{
  "mcpServers": {
    "solidworks": {
      "command": "uvx",
      "args": ["solidworks-mcp-python", "--year", "2026"]
    }
  }
}
Quit Claude Desktop from the system tray (closing the window isn't enough) and reopen it. Settings > Developer should show solidworks as running.
claude mcp add --scope user solidworks -- uvx solidworks-mcp-python --year 2026
Run /mcp in a new session to check that solidworks is connected.
Add this to %APPDATA%\Code\User\mcp.json:
{
  "servers": {
    "solidworks": {
      "type": "stdio",
      "command": "uvx",
      "args": ["solidworks-mcp-python", "--year", "2026"]
    }
  }
}
Run MCP: List Servers from the Command Palette and start solidworks. Its output should end with Discovered 155 tools (the count grows as tools are added).
Add this to %USERPROFILE%\.lmstudio\mcp.json:
{
  "mcpServers": {
    "solidworks": {
      "command": "uvx",
      "args": ["solidworks-mcp-python", "--year", "2026"]
    }
  }
}
Restart LM Studio and enable solidworks in the Program tab.
For mock mode, which needs no SolidWorks, use "args": ["solidworks-mcp-python", "--mock"]. Linux and WSL work for the docs, the tests and mock mode, but not for driving SolidWorks.
Set these in your client's env block for the server, or in the shell before starting it by hand. Every SOLIDWORKS_MCP_<FIELD> maps to the config field of the same name.
SolidWorks-as-Code session logging (off by default). Logs every adapter tool call to a local SQLite database, so a session can be replayed or exported as a runnable Python script (see docs/getting-started/solidworks-as-code.md).
| Variable | Default | Meaning |
|---|---|---|
SOLIDWORKS_MCP_SOC_LOGGING_ENABLED | false | Turn logging on. |
SOLIDWORKS_MCP_SOC_SESSION_ID | (generated) | Session name to log under. If unset while logging is on, a soc-YYYYMMDD-HHMMSS id is generated at startup. |
SOLIDWORKS_MCP_SOC_DB_PATH | .solidworks_mcp/agent_memory.sqlite3 | Override the database file. |
$env:SOLIDWORKS_MCP_SOC_LOGGING_ENABLED = "true"
$env:SOLIDWORKS_MCP_SOC_SESSION_ID = "my-bracket"
.\.venv\Scripts\solidworks-mcp.exe
# ...work in your MCP client...
.\.venv\Scripts\python.exe -m solidworks_mcp.agents.soc_exporter my-bracket my_bracket.py
It works only with the circuit-breaker adapter wrapper (the default for real SolidWorks); the mock adapter does not log.
API docs index auto-refresh (on by default). The API-lookup tools (lookup_api_interface, lookup_api_method, find_related_api_members) and search_solidworks_api_help read a JSON index built by discover_solidworks_docs. When the index is older than the threshold, the next lookup rebuilds it.
| Variable | Default | Meaning |
|---|---|---|
SOLIDWORKS_MCP_DOCS_INDEX_AUTO_REFRESH | true | Rebuild a stale index automatically. No-op without SolidWorks + win32com; a failed rebuild keeps serving the existing index. |
SOLIDWORKS_MCP_DOCS_INDEX_MAX_AGE_DAYS | 21 | Age after which the index counts as stale. |
Teach your agent the workflow
Each tool's description says what that tool does. The solidworks-mcp skill covers what spans tools: the order to build in (sketch, close it, then the feature), which inputs take millimetres and which take metres, how to pick faces and edges, checking the result with verify_model, recovering from errors, and the tools that don't work yet. Install it into Claude Code with:
uvx solidworks-mcp-python skill install
That writes ~/.claude/skills/solidworks-mcp/. Add --project for the current project's .claude/skills, or --dir <folder> for another agent's skills folder. It writes only that folder and needs no login. Re-run it after an upgrade.
Clients that read MCP resources don't need the install: the server serves the same skill at skill://solidworks-mcp/SKILL.md, and points to it in the instructions it sends when a client connects. More: Agent skill.
Contributing
install.ps1 gives you an editable install, so code changes take effect the next time a client starts the server. For the development tools, install the extras:
.\.venv\Scripts\python.exe -m pip install -e ".[dev,test,docs]"
.\dev-commands.ps1 lists the common workflows:
dev-install: install or update the local dev environmentdev-test: run the standard test suite (the CI-safe subset)dev-test-full: run the full suite, including smoke and integration pathsdev-lintanddev-format: lint checks and formattingdev-docs-build,dev-docs-strictanddev-docs-audit: build the docs, build them failing on warnings, or write an audit report to.generated/docs
To mirror GitHub Actions CI locally (Ubuntu, the conda env from solidworks_mcp.yml, and make test), run .\scripts\run-ci-local.ps1. The first run builds the image; add -NoBuild to re-run tests without rebuilding.
Docs
- Main docs site: https://andrewbartels1.github.io/SolidworksMCP-python/
- Home/overview: docs/index.md
Key docs sections:
- Getting Started: docs/getting-started
- MCP Server Guide: docs/user-guide
- Tool Catalog: docs/user-guide/tool-catalog
- Agents and Skills: docs/agents
- Planning/Roadmap: docs/planning
Direct links:
- Installation
- Quick Start
- Tutorial: U-Joint Assembly Build
- Tutorial Tracks
- VS Code MCP Setup
- Architecture
- Agents and Prompt Testing
- PydanticAI and Schemas
License
MIT License. See LICENSE.
Reviews
No reviews yet
Be the first to review this server!
More Developer Tools MCP Servers
Rea
Freeby Morluto · Developer Tools
Reverse engineer anything from your terminal or agent with one CLI and MCP server.
Paperclip
Freeby Paperclipai · Developer Tools
Trending hip-hop artist momentum scores across four cultural dimensions.
Fetch
Freeby Modelcontextprotocol · Developer Tools
Web content fetching and conversion for efficient LLM usage
Git
Freeby Modelcontextprotocol · Developer Tools
Read, search, and manipulate Git repositories programmatically
Toleno
Freeby Toleno · Developer Tools
Toleno Network MCP Server — Manage your Toleno mining account with Claude AI using natural language.
MCP Marketplace
Freeby mcp-marketplace · Developer Tools
Search and install MCP servers from inside your AI client.